
ND filters are a core part of the drone filming process – in fact any industry using cameras can take advantage of them. As part of our drone videography series, we will be looking at this gadgets, and how you can use them for your operations.
What are ND (Neutral Density) filters?
Simply put, they’re tools designed to reduce light exposure in your camera while maintaining image integrity.
Think of neutral density filters as sunglasses for the camera. They cut down light entering your lens, allowing you to capture stunning shots even in harsh sunlight. They’re called “neutral” because they don’t alter the colors in your photos or videos—just the intensity of light.
Historically, they were bulky and niche, but not so today. Whether you’re shooting landscapes, portraits, or videos, these filters unlock a vast range of creative possibilities
Light, Exposure, and Why They Matter
Light is everything. Too much, and you’ll blow out details. Too little, and your image is a dark mess.
Your camera’s exposure triangle—aperture, shutter speed, ISO—controls light. But in bright conditions, even the lowest ISO or fastest shutter speed isn’t enough. Whether shooting on a sunny beach or trying to capture the sparky of waterfalls, without an ND filter, your options are limited.
What do ND filters do?
Neutral Density filters block light through a darkened glass or resin.
There are three main types:
- Fixed ND Filters: Constant light reduction. Ideal for consistency.
- Variable ND Filters: Twist them to adjust the light reduction. Versatile but tricky.
- Graduated ND Filters: Perfect for balancing bright skies and darker landscapes.
Each type suits different scenarios. For instance, a fixed ND filter might be your go-to for long exposures, while a variable ND filter shines in fast-paced shoots.
Understanding ND Ratings
ND filters come with numbers like ND2, ND8, or ND64. But what do they mean? These numbers indicate the light reduction capabilities of the filter. Each number corresponds to how many “stops” of light the filter cuts. Basically, each “stop” halves the amount of light passing through.
| ND Filter | Stops of Light Reduction | Light Blocked | Light Transmitted |
|---|---|---|---|
| ND2 | 1 Stop | ½ = 50% | ½ = 50% |
| ND8 | 3 Stops | ⅙ = 87.5% | ⅛ = 12.5% |
| ND64 | 6 Stops | 63⁄64 = 98.44% | 1⁄64 = 1.56% |
Say you’re shooting a waterfall on a sunny day. Without a filter, your shot is overexposed. Adding an ND8 filter lets you slow down your shutter speed enough to blur the water beautifully while keeping other elements properly exposed.
Higher ND numbers like ND64 or ND1000 are ideal for extreme effects, such as capturing star trails or long daytime exposures. For subtle tweaks, lower ND filters like ND2 or ND4 work best.
Pro tip: Use higher stops for dramatic effects like motion blur or silky water. Lower stops are perfect for balancing highlights and shadows in slightly bright scenes.
Still unsure which ND rating to choose? Think about your lighting conditions and creative goals. A landscape photographer working in bright midday light might use an ND64, while a portrait shooter seeking shallow depth of field under moderate sunlight might prefer an ND8.
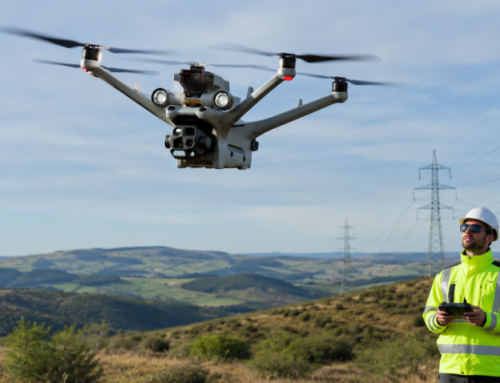
What Are ND Filters Used For In Drone Photography And Videography
Drone pilots typically deal with intense sunlight, reflective surfaces, or dynamic landscapes where exposure levels vary – making ND filters a key part of their operations.
- Control Exposure in Harsh Light: Bright conditions, like midday sunlight, can wash out details in your aerial shots. An ND16 or ND32 filter allows you to maintain balanced exposure, preserving both highlights and shadows.
- Enhance Motion Blur: In drone photography, motion blur can make roads, rivers, or fields look dynamic and cinematic. Slowing your drone’s shutter speed with an ND filter lets you achieve this effect without overexposing your shot.
- Maintain Proper Shutter Speed: In videography, shutter speed should match the frame rate (e.g., 1/50 for 24fps) for smooth motion. Bright conditions force higher shutter speeds, leading to choppy, unnatural footage. ND filters fix this, ensuring fluidity and realism in your aerial shots.
- Enhance Color and Depth: Overexposed footage loses vibrancy and depth. Using an ND filter helps preserve rich tones and contrasts, whether you’re capturing golden-hour landscapes or reflective urban skylines.
- Capture Evenly Exposed Landscapes: A mix of bright skies and darker terrain can result in uneven exposure. ND filters, especially graduated ones, balance this out, allowing you to capture every detail from the sky to the ground seamlessly.
For example, using an ND64 filter during a sunset shoot can create a dramatic effect with deep, vibrant colors while avoiding overexposed highlights. Or, when shooting coastal areas, an ND filter cuts down the reflective glare from the water for a crystal-clear view.
Filming a cityscape at noon without an ND filter can result in washed-out buildings and glaring skies. Adding an ND filter tones down the brightness, revealing intricate architectural details and dynamic skies.
Pro tip: Match the ND filter strength to your scene. For cloudy days, an ND4 or ND8 is sufficient, while bright, sunny conditions may require ND32 or even ND64 for the best results.
Related Reading: Drone Videography Guide: UAVs, Processing Software and Editing Techniques
Choosing the Right ND Filter
Choosing the right ND filter for drone camera setups requires careful consideration of your shooting environment and creative goals. Unlike handheld cameras, drones face unique lighting challenges:
- Evaluate Your Lighting Conditions: If you’re shooting in soft, overcast light, an ND4 or ND8 is typically sufficient. For bright, sunny conditions or reflective surfaces like water, opt for stronger filters like ND16 or ND32 to cut down glare and prevent overexposure.
- Consider Your Frame Rate: For smooth cinematic drone footage, match your shutter speed to your frame rate (e.g., 1/50 for 24fps). ND filters are essential to maintain this balance in bright environments. Use ND64 or ND128 for high-noon shoots when light is at its peak.
- Choose Compatible Filters: Ensure the ND filters are designed for your specific drone model. Popular drone brands like DJI offer filter sets tailored to models like the Mavic and Air series.
- Experiment with Graduated Filters: For aerial shots with dramatic skies, graduated ND filters balance exposure between the bright sky and darker ground, ensuring details in both areas are preserved.
For example, during a beach shoot, an ND16 filter can help control sunlight reflecting off the water, while an ND64 is ideal for smooth motion blur in crashing waves. Use an ND8 when flying at sunrise or sunset to capture vibrant colors without blowing out highlights.
Pro tip: Invest in a filter set (ND4, ND8, ND16, ND32) for flexibility across different scenarios.
Extra Tips For Using ND Filters
- Avoid Vignetting: Opt for slim-profile ND filters, especially when stacking multiple filters or using wide-angle lenses. Vignetting occurs when the edges of your filter interfere with your shot, creating unwanted dark corners.
- Prevent Color Casts: Even high-quality ND filters can sometimes introduce subtle color shifts. Test your filters in different lighting conditions and use tools like Lightroom to correct any issues during post-processing. Learn more about fixing color casts in this
- Master Exposure Calculations: Use apps like “ND Timer” or “PhotoPills” to calculate exposure times accurately when using ND filters. These apps help you adjust your settings seamlessly without the need for trial and error.
- Combine Filters Carefully: When stacking ND filters for extreme light reduction, ensure they are of the same brand and quality to avoid mismatched color tones or distortions.
- Test Before the Shoot: Practice using your ND filters in controlled environments to understand how they perform in various lighting situations. Familiarity will save you time on critical shoots.
- Work With Graduated Filters: For high-contrast scenes, graduated ND filters are invaluable. They allow you to balance bright skies with darker foregrounds, avoiding blown-out highlights or underexposed shadows.
- Use Drone-Specific Tips: For drone users, start with ND4 or ND8 for sunrise/sunset shots and move to ND16 or ND32 for midday brightness.
- Avoid Reflections: When shooting near water or glass, combine an ND filter with a circular polarizer to minimize glare and achieve crisp, detailed shots.
- Always Clean Your Filters: Dust and smudges can ruin an otherwise perfect shot. Use microfiber cloths and lens cleaning solutions before every session.
Post-Shoot Edits
Even with ND filters, editing drone footage requires specialized tools to achieve professional results. Some choices you can work with include:
- Adobe Premiere Pro: A favorite among professionals, Premiere Pro offers advanced tools like color grading, motion tracking, and seamless integration with Adobe After Effects. It’s perfect for enhancing drone footage by stabilizing shaky clips or fine-tuning exposure levels.
- DaVinci Resolve: Known for its industry-leading color correction capabilities, DaVinci Resolve is ideal for refining the vibrancy and contrast of drone shots. Its Fusion module also provides robust visual effects tools, making it a great choice for both beginners and experts.
- Final Cut Pro: For Mac users, Final Cut Pro comes with enhanced performance with its magnetic timeline and advanced editing features. Its powerful stabilization tool can smooth out footage taken in windy conditions, a common challenge in drone videography.
- Lumen5: While not specifically designed for drone footage, Lumen5’s AI-driven features make it easy to create quick, social-media-ready videos. Its drag-and-drop interface is user-friendly and great for short-form content.
- Filmora: A more budget-friendly option, Filmora offers plenty of features like motion tracking and speed ramping to enhance drone videos. It’s perfect for hobbyists who want professional-quality edits without the steep learning curve.
Pro tip: Always shoot in high resolution and flat color profiles (like D-Log or D-Cinelike) to maximize editing flexibility.
Advanced Techniques for Mastering ND Filters
To truly push your creativity with ND filters, here are advanced techniques that will elevate your photography or videography to the next level:
- Stack Filters for Extreme Effects: Combine multiple ND filters, like an ND10 and an ND6, to create hours-long exposures. This is perfect for capturing star trails or long exposures of cityscapes at night. Ensure that stacked filters are of high quality to avoid color mismatches or vignetting.
- Use Reverse Graduated ND Filters: These are ideal for scenarios where the horizon is brighter than the sky above, such as during sunrise or sunset. The reverse gradient helps balance the exposure across your frame.
- Experiment with Infrared Photography: ND filters with a high optical density can also be used for infrared photography, creating surreal, dreamlike images. This requires a full-spectrum camera or an infrared-converted one.
- Create Time-Lapse Videos: Use ND filters to smooth out motion in time-lapse sequences. This is particularly effective for bustling urban scenes, fast-moving clouds, or flowing water.
- Combine ND and Polarizing Filters: For enhanced contrast and reduced glare, pair an ND filter with a circular polarizer. This is particularly useful for water or glass surfaces, creating crisp, detailed images.
- Play with Shutter Dragging: Use ND filters to drag the shutter speed during daytime, capturing creative motion blur in moving objects while keeping the rest of the scene sharp.
- Long Exposure Portraiture: Combine ND filters with strobes or flashes to shoot portraits with motion effects, like flowing fabric or hair, while maintaining sharpness in the subject’s face. Check out tips on long exposure portraiture
ND Filters Across Niches
Every photography and videography niche can benefit immensely from ND filters. Here are some specific niches and how they use these game-changing tools:
- Portrait Photography: Use ND filters to achieve dreamy, shallow depth of field in bright outdoor conditions. This allows for wide apertures and creamy bokeh even during midday shoots.
- Landscape Photography: Balance harsh skies with detailed terrain by using graduated ND filters. These filters help prevent blown-out skies while maintaining shadow detail in the foreground.
- Drone Videography: ND filters are essential for cinematic drone footage. They reduce glare, control overexposure from bright sunlight, and allow for smooth motion by maintaining the proper shutter speed for the frame rate. For instance, an ND16 or ND32 can make all the difference when filming reflective water or cityscapes.
- Astrophotography: ND filters can be used for capturing solar events, such as solar eclipses or sunspots, without damaging your camera sensor.
- Street Photography: Blur motion in crowds for a dynamic urban feel. ND filters let you slow down your shutter speed to create artistic effects in bustling city scenes.
Busting Myths About ND Filters
Now lets address some of those issues that are being peddled out there.
- “ND Filters Are Only for Professionals”
Not true. While professionals love ND filters for their versatility, they are also beginner-friendly tools. Even amateur photographers can use them to experiment with creative effects, like long exposures or motion blur.
- “ND Filters Reduce Image Quality”
High-quality ND filters do not degrade your image. Cheaper filters might introduce issues like vignetting or color casts, but reputable brands ensure your shots remain sharp and true to color.
- “ND Filters Are Useless for Drone Videography”
Wrong again. ND filters are essential for smooth, cinematic drone footage. They help maintain proper shutter speeds and reduce glare from reflective surfaces like water or buildings.
- “You Can’t Use ND Filters in Low Light”
While it’s true that ND filters reduce light, they can still be used creatively in low light situations, such as adding motion blur to evening street scenes or smoothing water under a dim sky.
- “ND Filters Are Just for Landscapes”
Far from it. ND filters are invaluable in niches like portrait photography (for shallow depth of field), astrophotography (for solar captures), and event videography (for consistent motion blur). Their versatility makes them a staple across many genres.
Worried about focusing with dark filters? Use live view or remove the filter to focus first, then reattach the filter before taking the shot.
Troubleshooting Common Problems with ND Filters
Using ND filters can sometimes present challenges. Here are some common problems and how to solve them:
- Vignetting on Wide-Angle Lenses: Vignetting occurs when the edges of the filter intrude into the frame, causing dark corners. To avoid this, use slim-profile filters specifically designed for wide-angle lenses.
- Color Casts: Some ND filters may introduce a color shift, affecting the accuracy of your image. High-quality filters minimize this issue, but you can also correct color casts in post-processing using tools like Adobe Lightroom.
- Focusing Issues: Dark ND filters can make focusing difficult. To solve this, focus first without the filter attached, then carefully screw the filter onto your lens without changing the focus. Alternatively, use live view or focus peaking features on your camera.
- Filter Flare: Flare can happen when light reflects between the filter and lens. Use a lens hood or avoid shooting directly into strong light sources to minimize this. Read about preventing lens flare here.
- Difficulty Calculating Exposure: When using strong ND filters, manual adjustments to exposure settings can be tricky. Use apps like “PhotoPills” or “ND Timer” to calculate the correct exposure easily.
- Stacking Filter Challenges: Combining multiple ND filters can cause vignetting, reduced sharpness, or mismatched color tones. Always test stacked filters beforehand and use high-quality, slim-profile options for better results.
- Drone ND Filter Attachment Issues: In drone videography, ensuring the ND filter is securely attached is critical. Use filters designed specifically for your drone model to prevent accidental detachment during flight.
- Scratches and Dust: ND filters are prone to scratches and smudges that degrade image quality. Always carry a microfiber cloth and lens cleaning solution for maintenance.
Drone Videography Lessons Available
Interested in making professional-grade drone footage? From operating the UAVs, planning and executing the operation, to post-production edits to meet the demands of your client, you can learn it all with ABJ Academy’s Drone Videography Training Course.